Creating a new campaign
Learn how to create a new campaign in Tarvent, from choosing your purpose to setting up your From details and inbox preview.
What we'll cover
- Overview
- Step 1 – Purpose, editor, and testing
- Step 2 – Choose a template
- Step 3 – Campaign details & inbox preview
- After the campaign is created
1 Overview
Campaign creation is a guided three–step process:
- Step 1: Select the campaign purpose, editor type, and multivariate testing options.
- Step 2: Pick a template or start from previous work.
- Step 3: Set the campaign name, audience, From details, subject, and preview text.
Once the three steps are complete, Tarvent creates the campaign and takes you to the editor, where you can design the content and adjust most settings.
2 Step 1 – Purpose, editor, and testing
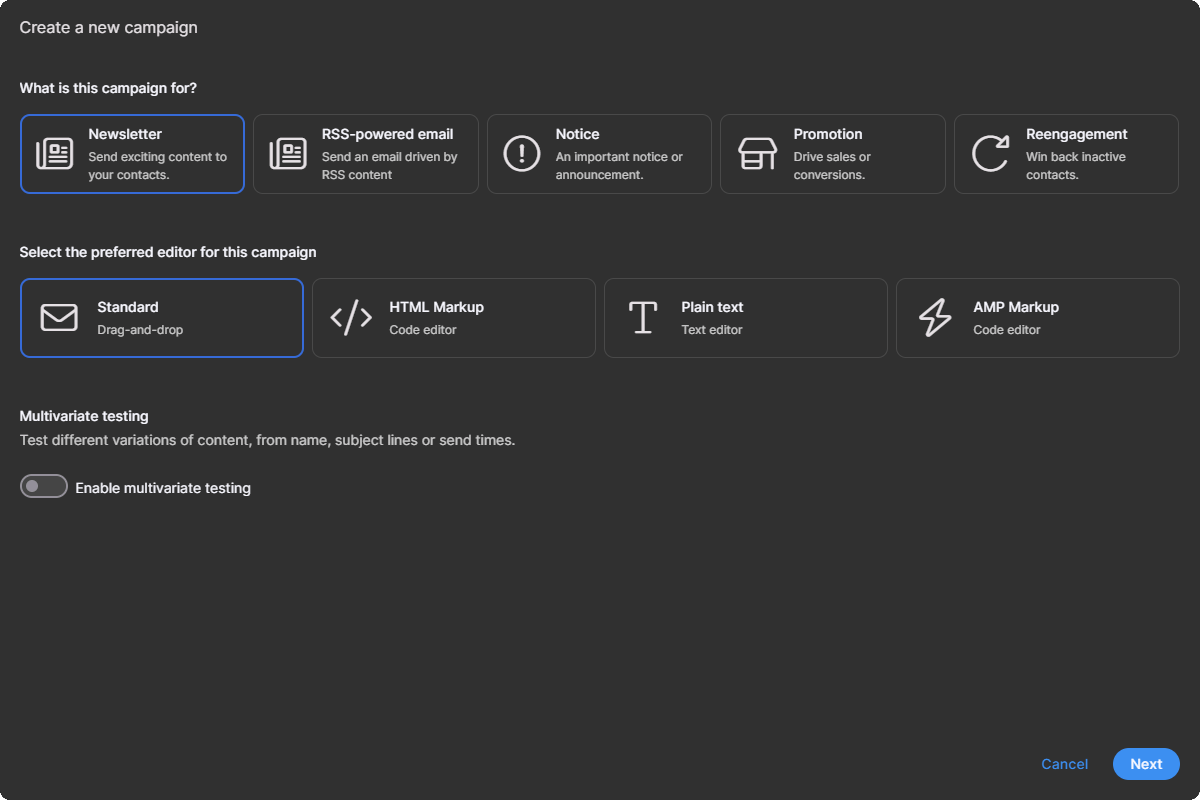
The first step helps you tell Tarvent what this campaign is for, which editor you want to use, and whether you intend to run multivariate tests.
Campaign purpose
The campaign purpose options (Newsletter, RSS-powered email, Notice, Promotion, Reengagement, and so on) describe the main goal of the email.
- Today, purpose is mainly informational, but it will play a bigger role as Artitelli, Tarvent’s marketing navigator, learns how contacts engage with different types of email.
- In the future, this information will help drive better engagement insights and recommended next steps based on the purpose of each campaign.
Editor selection
The editor selector lets you choose how you want to build the email:
- Standard: Drag-and-drop editor that generates mobile-first HTML tested on over 70 operating systems, email clients, and devices. This is the best choice for most campaigns.
- HTML Markup: Code editor for teams that want full control of the HTML.
- Plain text: Simple text-only emails without HTML formatting.
- AMP Markup: Code editor for AMP-based campaigns (where supported).
- RSS-powered email: Editor focused on campaigns driven by RSS content.
Multivariate testing
You can decide whether to enable multivariate testing for this campaign.
- When multivariate testing is enabled, you can define up to 10 combinations of From name, subject line, and content variations. Tarvent will send these to a sample of your audience, measure performance, and choose a winner.
- If you leave multivariate testing disabled, you can still test different send times using send-time testing options.
Pro tip: If you are trying a new subject line or From name, enable multivariate testing so Tarvent can help you find the winning combination before you send to your full audience.
3 Step 2 – Choose a template
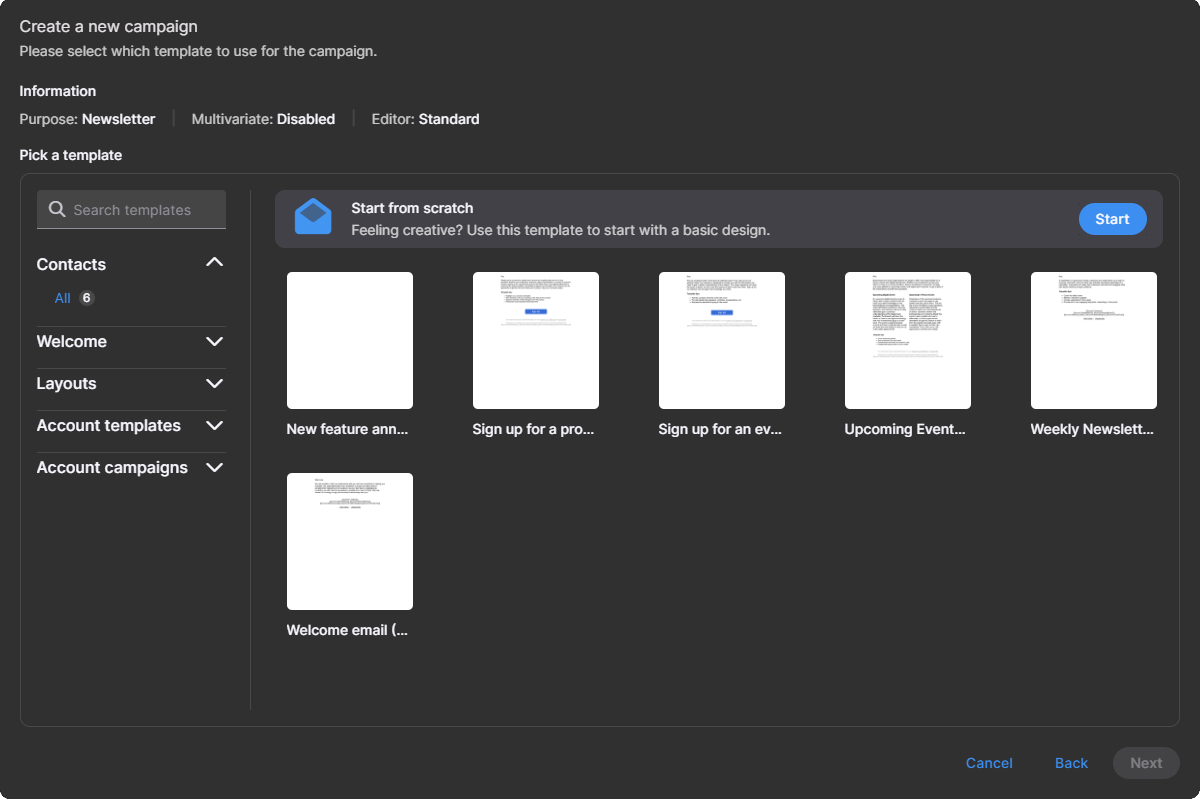
In Step 2, you choose how to start the content for your campaign.
Using templates
The template picker includes both Tarvent-provided templates and your own saved templates.
- You can create your own templates and organize them with tags. Those tags appear in the left navigation, making it easy to browse by category.
- You can choose a pre-designed Tarvent template or one of your account templates to speed up your workflow and keep branding consistent.
Copying a previously sent campaign
Instead of starting from a blank template, you can also base your new campaign on a previously sent one.
- When you select a previously sent campaign, Tarvent copies the existing content, styling, and many settings into the new campaign.
- This is ideal when you run recurring newsletters or repeating announcements.
Starting from scratch
If you select Start from scratch, Tarvent uses a simple, non-branded layout as your starting point.
- The layout includes common elements such as a header, body sections, and a footer.
- You can delete or rearrange any of these elements to create your own structure.
At the top of the Step 2 screen, you will see a summary of the settings you chose in Step 1 (purpose, multivariate testing, and editor). This helps you confirm that you are working with the correct setup before you move on.
4 Step 3 – Campaign details & inbox preview
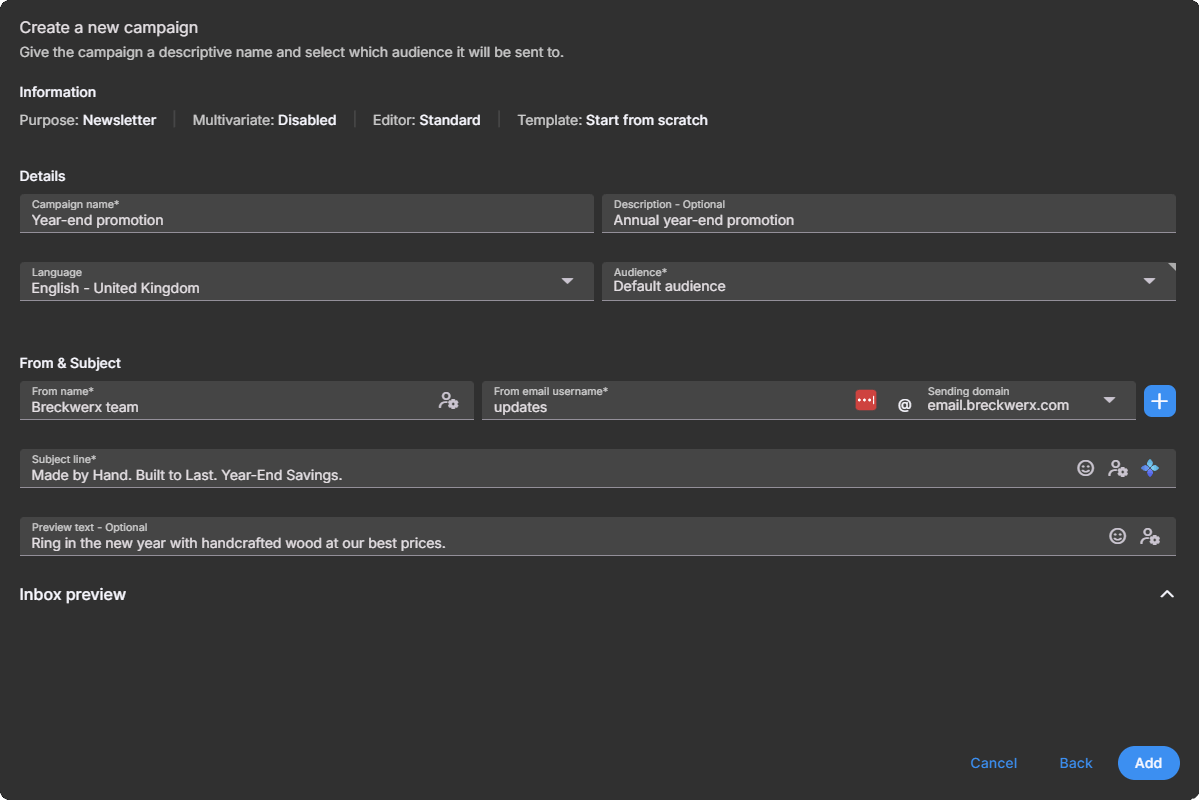
In Step 3, you define how the campaign appears internally and how it appears in your recipients’ inboxes.
Campaign name and description
- Campaign name: Must be unique within your account and is used only inside Tarvent. Contacts never see this name.
- Description: Optional internal note to help your team remember what this campaign is about.
Language and audience
- Language: Sets the character encoding used for the campaign. This is especially important for languages that require specific encodings. When you use personalization with formatting functions (for example, date or text formatting), the language determines how those functions behave for that culture.
- Audience: If your account has more than one audience, you can choose which audience this campaign belongs to. The audience determines:
- Which contacts the campaign can be sent to.
- Which personalization fields are available when building the content.
From details
- From name: The name your recipients see in their inbox (for example, "Breckwerx team"). Choose a name that your contacts will recognize and trust.
- From email username: The local part of the email address (the portion to the left of the
@symbol). This can be any value you choose (for example,updatesinupdates@example.com). - Sending domain: The domain portion of the From address (the part after the
@). You must configure and verify a sending domain before it can be used in a campaign. Use the + button next to the field to add a new sending domain. For more information, see Managing from domains .
Subject line and preview text
- Subject line: Supports emoji, personalization, and Artitelli assistance to help you write an effective subject. Personalization can include formatting functions such as "Make titlecase," which capitalizes the first letter of each word for multiple cultures and languages.
- Preview text: Does not support emoji, but supports the same personalization options and Artitelli assistance as the subject line. This text appears next to or below the subject in most email clients and can strongly influence whether recipients open the email.
Inbox preview
The Inbox preview section can be expanded to show how your campaign will appear in popular email clients such as Gmail, Outlook, and iCloud Mail.
- Use this preview to confirm that your From name, subject line, and preview text look the way you expect in real inboxes.
Pro tip: Before clicking Add, read your From name, subject, and preview text together in the inbox preview. They should tell a clear, compelling story about why the recipient should open your email.
5 After the campaign is created
Once you complete all three steps and click Add, Tarvent creates the campaign and takes you to the campaign editor.
- In the editor, you can build and update your email content, adjust settings, and configure multivariate tests or send-time options.
- You can change any of the settings defined during the creation process, including campaign name, description, audience, From details, subject line, preview text, template content, and multivariate testing options.
- The only setting that cannot be changed after creation is the Language setting.
When you are satisfied with the content and settings, you can schedule the campaign or send it immediately, knowing that Tarvent and Artitelli will track engagement to help you improve future sends.